How To Create Dynamic Slider Using Laravel Step By Step
Last updated: March 28, 2024 By Sunil Shaw

Introduction
Slider is an important item for web applications. most of the time ecommerce industry. In this blog we will see how to create dynamic slider using laravel step by step.
What is laravel framework in php
Laravel is a open source popular web framework written in PHP. It is used for building web applications. It provides lots of tool and features that help in development process and make tasks such as routing, authentication, caching and sessions management easier.
1. Eloquent ORM
Instead of writing complex database code, Laravel lets you work with databases using simpler commands, making it easier to store and retrieve information. Laravel comes with a powerful ORM (Object-Relational Mapping) called Eloquent, which simplifies database operations by allowing developers to work with databases using PHP syntax rather than writing SQL quries directly.
2. Blade Templating Engine
With Laravel, you can create web pages that look good and work well. It has a special tool called Blade that helps you organize your webpage’s design. lade, Laravel’s lightweight yet powerful templating engine, empowers developers to craft dynamic, reusable, and clean code for their application’s frontend.
3. Routing
Laravel helps your application where to send users when they click on different links. It’s like giving directions to visitors so they end up in the right place. Laravel provides a simple and expressive syntax for defining application routes, making it easy to handle incoming requests and direct them to the appropriate controllers and methods.
4. Middlewware
Laravel middleware provides a method for filtering HTTP requests entering your web application. It is useful for tasks such as authentication, logging and session management. If you want that your web app to do special things like letting users log in or protecting certain pages, Laravel can help with that too.
5. Artisan Console
Laravel comes with a commandline helper called Artisan that can do lots of tasks for you automatically, like setting up databases or creating new parts of your laravel application. Artisan is an command-line interface, which provides various commands for automating repetitive tasks like database migrations, seeding and generating boilerplate code.
6. Authentication and Authorization
Laravel helps you keep your web app safe from bad things happening, like making sure only the right people can access certain parts of your web apps. It simplifies the implementation of authentation and authorization mechanisms, including user registration, login, password reset and access control.
Testing
Laravel helps you test your web app to make sure it works as it should before you show it to the world. It supports testing out of the box with PHP Unit, making it easy to write and execute tests for your application.
Laravel, promotes clean, elegant and maintainable code making it a popular choice among developers for building web applications of varying complexities. It is like a friend that makes building web application easier and faster by providing helpful tools and shortcuts.
Create Dynamic Slider Using Laravel Step By Step
Today in this article we will learn how to create dynamic slider using laravel.
Requirement
PHP 8.3.3
"laravel/framework": "10.10"
In this tutorial i am using php and laravel version mention above. If you want to try on another version, you can, if you got any error or bug just try to resolve, or comment in comment box.
Step 1
Create an laravel fresh projects.
composer create-project laravel/laravel sliderStep 2
Create Views
We will use bootstrap to design the page. I am using Bootstrap CDN to access bootstrap.
Create welcome.blade.php in Resources/Views and paste this code into it.
<!DOCTYPE html>
<html lang="en">
<head>
    <meta charset="UTF-8" />
    <title>CodeWithRonny</title>
    <meta name="viewport" content="width=device-width,initial-scale=1" />
    <meta name="description" content="" />
    <link rel="icon" href="favicon.png">

    <link rel="stylesheet" href="https://cdn.jsdelivr.net/npm/bootstrap@5.3.2/dist/css/bootstrap.min.css">
</head>
<body class="bg-success bg-opacity-10">

    <div class="container">
        <h1>CodeWithRonny</h1>
        <div class="card" style="width: 70rem; height: 35rem">

          <div class="card-body">
            <div id="carouselExampleCaptions" class="carousel slide">
              <div class="carousel-indicators">
                <button type="button" data-bs-target="#carouselExampleCaptions" data-bs-slide-to="0" class="active" aria-current="true" aria-label="Slide 1"></button>
                <button type="button" data-bs-target="#carouselExampleCaptions" data-bs-slide-to="1" aria-label="Slide 2"></button>
                <button type="button" data-bs-target="#carouselExampleCaptions" data-bs-slide-to="2" aria-label="Slide 3"></button>
              </div>
              <div class="carousel-inner">

                @foreach($sliders as $slider)

                    <div class="carousel-item @if( $loop->iteration == 1) active @endif" id="myCarousel">
                      <img src="{{ $slider->image }}" class="d-block w-100" alt="..." height="520rem">
                      <div class="carousel-caption d-none d-md-block">
                        <h6>{{ $slider->title }}</h6>
                        <p>{{ $slider->tagline }}</p>
                        <a href="{{ $slider->url }}" class="btn btn-primary">Read More</a>
                      </div>
                    </div>

                @endforeach

              </div>
              <button class="carousel-control-prev text-primary" type="button" data-bs-target="#carouselExampleCaptions" data-bs-slide="prev">
                <span class="carousel-control-prev-icon  text-primary" aria-hidden="true"></span>
                <span class="visually-hidden">Previous</span>
              </button>
              <button class="carousel-control-next  text-primary" type="button" data-bs-target="#carouselExampleCaptions" data-bs-slide="next">
                <span class="carousel-control-next-icon  text-primary" aria-hidden="true"></span>
                <span class="visually-hidden">Next</span>
              </button>
            </div>

          </div>
        </div>


</div>
<script type="text/javascript">
    $(document).ready(function () {
      $('#myCarousel').find('.item').first().addClass('active');
    });
</script>

<script type="text/javascript" src="https://cdn.jsdelivr.net/npm/bootstrap@5.3.2/dist/js/bootstrap.min.js"></script>
</body>
</html>
Preview:

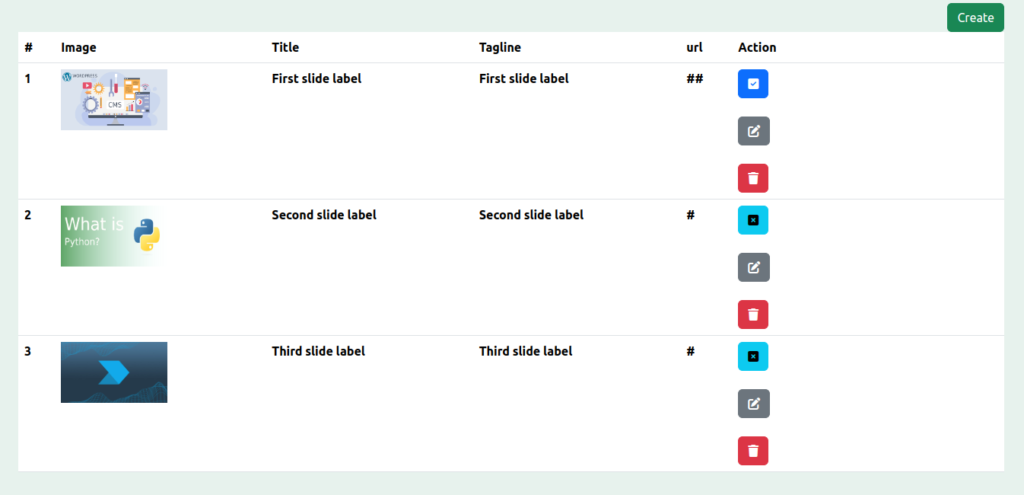
Step 3
create an folder name slider in resources/views and create an view called index.blade.php. Paste this code into you index.blade.php
<!DOCTYPE html>
<html lang="en">
<head>
<meta charset="UTF-8" />
<title>CodeWithRonny</title>
<meta name="viewport" content="width=device-width,initial-scale=1" />
<meta name="description" content="" />
<link rel="icon" href="favicon.png">
<link rel="stylesheet" href="https://cdn.jsdelivr.net/npm/bootstrap@5.3.2/dist/css/bootstrap.min.css">
<link rel="stylesheet" href="https://cdnjs.cloudflare.com/ajax/libs/font-awesome/6.5.1/css/all.min.css" integrity="sha512-DTOQO9RWCH3ppGqcWaEA1BIZOC6xxalwEsw9c2QQeAIftl+Vegovlnee1c9QX4TctnWMn13TZye+giMm8e2LwA==" crossorigin="anonymous" referrerpolicy="no-referrer" />
</head>
<body class="bg-success bg-opacity-10">
<h1>CodeWithRonny</h1>
<div class="container ">
@if ($errors->any())
<div class="alert alert-danger">
<strong>Whoops!</strong><br><br>
<ul>
@foreach ($errors->all() as $error)
<li>{{ $error }}</li>
@endforeach
</ul>
</div>
@endif
<a href="{{ route('slider.create') }}" type="button" class="float-end"><button class="btn btn-success">Create</button></a>
<div class="">
<table class="table">
<thead>
<tr>
<th scope="col">#</th>
<th scope="col">Image</th>
<th scope="col">Title</th>
<th scope="col">Tagline</th>
<th scope="col">url</th>
<th scope="col">Action</th>
</tr>
</thead>
<tbody>
@foreach($sliders as $slider)
<tr class="">
<th scope="col">{{ $loop->iteration }}</th>
<th scope="col"><img src="{{ $slider->image }}" width="140rem" height="80rem" /></th>
<th scope="col">{{ $slider->title }}</th>
<th scope="col">{{ $slider->tagline }}</th>
<th scope="col">{{ $slider->url }}</th>
<th scope="col"><div class="row">
@if($slider->is_active == 1)
<a href="{{ route('slider.disable',$slider->id) }}"><button type="button" class="btn btn-info"><i class="fa-solid fa-square-xmark"></i></button></a>
@else
<a href="{{ route('slider.enable',$slider->id) }}"><button type="button" class="btn btn-primary"><i class="fa-solid fa-square-check"></i></button></a>
@endif
<a href="{{ route('slider.edit',$slider->id) }}"><button type="button" class="btn btn-secondary"><i class="fa-sharp fa-solid fa-pen-to-square"></i></button></a>
<form action="{{ route('slider.destroy',$slider->id) }}" method="POST">
@csrf
@method('DELETE')
<button type="submit" class="btn btn-danger"><i class="fa-sharp fa-solid fa-trash"></i></button>
</form>
</div></th>
</tr>
@endforeach
</tbody>
</table>
</div>
</div>
<script type="text/javascript" src="https://cdn.jsdelivr.net/npm/bootstrap@5.3.2/dist/js/bootstrap.min.js"></script>
</body>
</html>Preview:
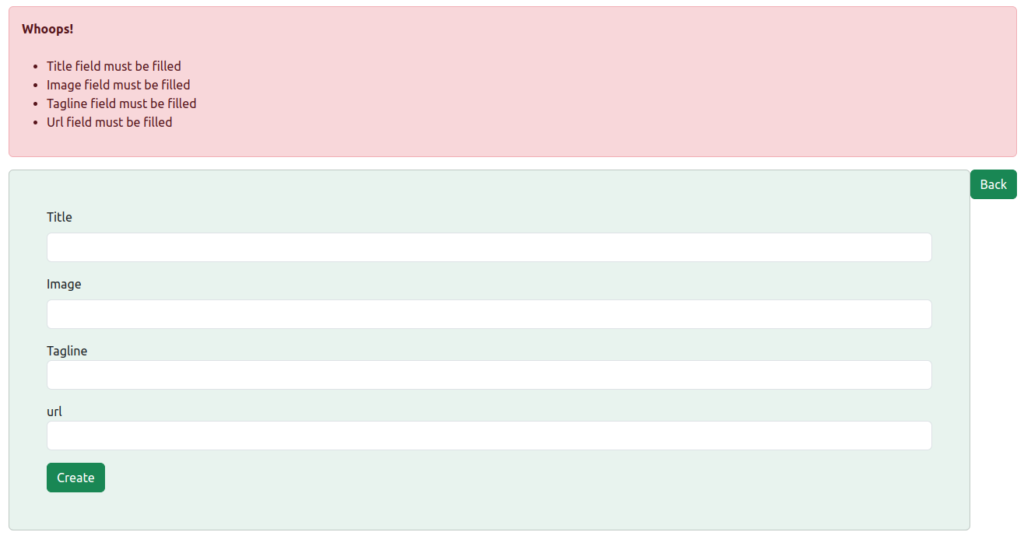
Step 4
Create an file add.blade.php and paste these all code into it.
<!DOCTYPE html>
<html lang="en">
<head>
	<meta charset="UTF-8" />
	<title>CodeWithRonny</title>
	<meta name="viewport" content="width=device-width,initial-scale=1" />
	<meta name="description" content="" />
	<link rel="icon" href="favicon.png">

	<link rel="stylesheet" href="https://cdn.jsdelivr.net/npm/bootstrap@5.3.2/dist/css/bootstrap.min.css">
</head>
<body>
	<h1>CodeWithRonny</h1>


	<div class="container">
		@if ($errors->any())
        <div class="alert alert-danger">
            <strong>Whoops!</strong><br><br>
            <ul>
                @foreach ($errors->all() as $error)
                    <li>{{ $error }}</li>
                @endforeach
            </ul>
        </div>
		@endif
		<a href="{{ route('slider.index') }}" type="button" class="float-end"><button class="btn btn-success">Back</button></a>

		<div class="card p-5 bg-success bg-opacity-10">
		<form class="form-horizontal" method='POST' enctype="multipart/form-data" action="{{ route('slider.store') }}">
			@csrf
		  <div class="mb-3">
		    <label for="title" class="form-label">Title</label>
		    <input type="text" class="form-control" id="title" name="title" aria-describedby="emailHelp">

		  </div>
		  <div class="mb-3">
		    <label for="image" class="form-label">Image</label>
		    <input type="text" class="form-control" id="image" name="image">
		  </div>

		  <div class="mb-3">
		  	<label class="form-check-label" for="tagline">Tagline</label>
		    <input type="text" class="form-control" id="tagline" name="tagline">

		  </div>
		  <div class="mb-3">
		  	<label class="form-check-label" for="url">url</label>
		    <input type="text" class="form-control" id="url" name="url">

		  </div>

		  <button type="submit" class="btn btn-success"><i class="fa-solid fa-square-plus"> </i>Create</button>
		</form>
		</div>
	</div>


<script type="text/javascript" src="https://cdn.jsdelivr.net/npm/bootstrap@5.3.2/dist/js/bootstrap.min.js"></script>
</body>
</html>
Preview:
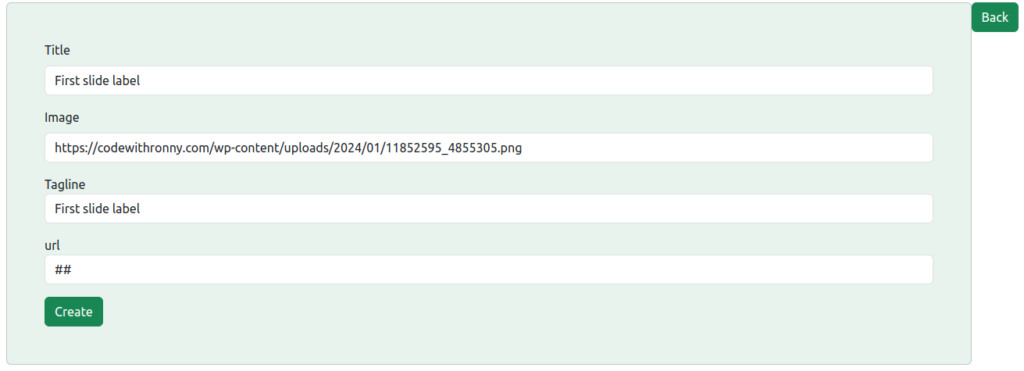
Step 5
Create file edit.blade.php and paste these all code into it.
<!DOCTYPE html>
<html lang="en">
<head>
	<meta charset="UTF-8" />
	<title>CodeWithRonny</title>
	<meta name="viewport" content="width=device-width,initial-scale=1" />
	<meta name="description" content="" />
	<link rel="icon" href="favicon.png">

	<link rel="stylesheet" href="https://cdn.jsdelivr.net/npm/bootstrap@5.3.2/dist/css/bootstrap.min.css">
</head>
<body>
	<h1>CodeWithRonny</h1>


	<div class="container">
		@if ($errors->any())
        <div class="alert alert-danger">
            <strong>Whoops!</strong><br><br>
            <ul>
                @foreach ($errors->all() as $error)
                    <li>{{ $error }}</li>
                @endforeach
            </ul>
        </div>
		@endif
		<a href="{{ route('slider.index') }}" type="button" class="float-end"><button class="btn btn-success">Back</button></a>
		<div class="card p-5 bg-success bg-opacity-10">
		<form class="form-horizontal" method='POST' enctype="multipart/form-data" action="{{route('slider.update',$slider->id)}}">
			@csrf
			@method('PUT')
		  <div class="mb-3">
		    <label for="title" class="form-label">Title</label>
		    <input type="text" class="form-control" id="title" name="title" value="{{ $slider->title }}" aria-describedby="emailHelp">

		  </div>
		  <div class="mb-3">
		    <label for="image" class="form-label">Image</label>
		    <input type="text" class="form-control" id="image" name="image" value="{{ $slider->image }}">
		  </div>

		  <div class="mb-3">
		  	<label class="form-check-label" for="tagline">Tagline</label>
		    <input type="text" class="form-control" id="tagline" name="tagline" value="{{ $slider->tagline }}">

		  </div>
		  <div class="mb-3">
		  	<label class="form-check-label" for="url">url</label>
		    <input type="text" class="form-control" id="url" name="url" value="{{ $slider->url }}">

		  </div>

		  <button type="submit" class="btn btn-success"><i class="fa-solid fa-square-plus"> </i>Create</button>
		</form>
		</div>
	</div>


<script type="text/javascript" src="https://cdn.jsdelivr.net/npm/bootstrap@5.3.2/dist/js/bootstrap.min.js"></script>
</body>
</html>
Preview:
Step 6
Ok let’s create model named Slider.php . It helps in inserting and retrieving data from database.
<?php

namespace App\Models;

use Illuminate\Database\Eloquent\Factories\HasFactory;
use Illuminate\Database\Eloquent\Model;

class Slider extends Model
{
    use HasFactory;
    protected $table = "slider";
    protected $fillable = [ 'id', 'title', 'image', 'url', 'tagline', 'is_active','created_at', 'updated_at'];
}
Step 7
now let’s create an controller called SliderController.php.
<?php

namespace App\Http\Controllers;

use Illuminate\Http\Request;
use App\Http\Controllers\Controller;
use App\Models\Slider;


class SliderController extends Controller
{
    function __construct()
    {
        //
    }

    public function index()
    {
        $sliders = Slider::get()->all();
        $title = 'Slider';
        return view('slider.index',compact('sliders','title'));
    }


    public function create()
    {
        $title = 'Slider';
        return view('slider.add',compact('title'));
    }


    public function store(Request $request)
    {

        $this->validate($request,[
            'title' => 'required',
            'image' => 'required',
            'tagline' => 'required',
            'url' => 'required',


        ],
        [
            'title.required' => 'Title field must be filled',
            'image.required' => 'Image field must be filled',
            'tagline.required' => 'Tagline field must be filled',
            'url.required' => 'Url field must be filled',


        ]
    );


        $data = $request->all();
              // print_r($data);
              // die;

              $slider =  Slider::create([
                'title'             => $data['title'],
                'image'             => $data['image'],
                'tagline'             => $data['title'],
                'url'             => $data['url'],
                'is_active'             => 1


               ]);
             if(isset($slider)) {
              return redirect()->route('slider.index')
                  ->with('success','Slider created successfully.');
              }else{
                  return redirect()->back()
                  ->with('error',
                   'Action Failed Please try again.');
              }

    }


    public function show(Slider $slider)
    {
        $title = "Slider Show";
        return view('auth.dashboard.settings.Slider.show',compact('title','slider'));
    }


    public function edit(Slider $slider)
    {
        $title = 'Slider Edit';
        return view('slider.edit',compact('slider','title'));
    }


    public function update(Request $request, $id)
    {
        $this->validate($request,[
            'title' => 'required',
            'image' => 'required',
            'tagline' => 'required',
            'url' => 'required',


        ],
        [
            'title.required' => 'Title field must be filled',
            'image.required' => 'Image field must be filled',
            'tagline.required' => 'Tagline field must be filled',
            'url.required' => 'Url field must be filled',


        ]
    );

         $slider = Slider::findOrFail($id);
          //dd($request->file('file'));
          $slider->image            = $request->input('image');
          $slider->title            = $request->input('title');
          $slider->tagline            = $request->input('tagline');
          $slider->url            = $request->input('url');

          $update = $slider->update();
          if(isset($update)) {
              return redirect()->route('slider.index')->with('success','Slider updated successfully');
          }else{
              return redirect()->back()->with('error','Action Failed Please try again.');
          }
    }

    public function disable(Request $request, $id)
    {
        $slider = Slider::findOrFail($id);

          $slider->is_active            = 0;
          $update = $slider->update();


          if(isset($update)) {
              return redirect()->route('slider.index')->with('success','One Slider Catelogue disabled');
          }else{
              return redirect()->back()->with('error','Action Failed Please try again.');
          }


    }
    public function enable(Request $request, $id)
    {
        $slider = Slider::findOrFail($id);

          $slider->is_active            = 1;
          $update = $slider->update();


          if(isset($update)) {
              return redirect()->route('slider.index')->with('success','One Slider Catelogue enabled');
          }else{
              return redirect()->back()->with('error','Action Failed Please try again.');
          }
    }


    public function destroy(Slider $slider)
    {
        $slider->delete();
        return redirect()->route('slider.index')
                        ->with('success','Slider deleted successfully');
    }
}
Step 8
Create HomeController.php. we created this controller to serve slider on different frontend page.
<?php

namespace App\Http\Controllers;

use Illuminate\Http\Request;
use App\Http\Controllers\Controller;
use App\Models\Slider;


class HomeController extends Controller
{
    function __construct()
    {
        //
    }

    public function home()
    {
        $sliders = Slider::get()->all();

        return view('welcome',compact('sliders'));
    }


}
Step 9
Lets’ create route for backend and frontend
Route::get('/','App\Http\Controllers\HomeController@home');


Route::resource('slider','App\Http\Controllers\SliderController');
Route::get('slider/disable/{id}','App\Http\Controllers\SliderController@disable')->name('slider.disable');
Route::get('slider/enable/{id}','App\Http\Controllers\SliderController@enable')->name('slider.enable');
Step 10
This is last step, here you have to setup the database.
Go to your .env file and connect with your database. Find these below lines and replace with your Database, Username and Password.
DB_DATABASE=CodeWithRonny
DB_USERNAME=root
DB_PASSWORD=password
Here is the SQL quries to create slider table for your project. You can use this query or you can try this structure.
SET SQL_MODE = "NO_AUTO_VALUE_ON_ZERO";
START TRANSACTION;
SET time_zone = "+00:00";

CREATE TABLE `slider` (
  `id` int NOT NULL,
  `title` varchar(255) NOT NULL,
  `image` varchar(255) NOT NULL,
  `url` varchar(255) NOT NULL,
  `tagline` varchar(255) NOT NULL,
  `is_active` int NOT NULL,
  `created_at` timestamp NOT NULL,
  `updated_at` timestamp NOT NULL
) ENGINE=InnoDB DEFAULT CHARSET=utf8mb4 COLLATE=utf8mb4_0900_ai_ci;

INSERT INTO `slider` (`id`, `title`, `image`, `url`, `tagline`, `is_active`, `created_at`, `updated_at`) VALUES
(2, 'First slide label', 'https://codewithronny.com/wp-content/uploads/2024/01/11852595_4855305.png', '##', 'First slide label', 0, '2024-03-10 02:42:27', '2024-03-11 04:51:43'),
(3, 'Second slide label', 'https://codewithronny.com/wp-content/uploads/2024/01/what_is_python.png', '#', 'Second slide label', 1, '2024-03-10 12:21:27', '2024-03-10 12:21:27'),
(4, 'Third slide label', 'https://codewithronny.com/wp-content/themes/CodeWithRonny/assets/images/courses/4by3/01.jpg', '#', 'Third slide label', 1, '2024-03-10 12:22:00', '2024-03-10 12:22:00');

ALTER TABLE `slider`
  ADD PRIMARY KEY (`id`);

ALTER TABLE `slider`
  MODIFY `id` int NOT NULL AUTO_INCREMENT, AUTO_INCREMENT=8;
COMMIT;
Here is the table from slider. Review and you can try to create your own table.
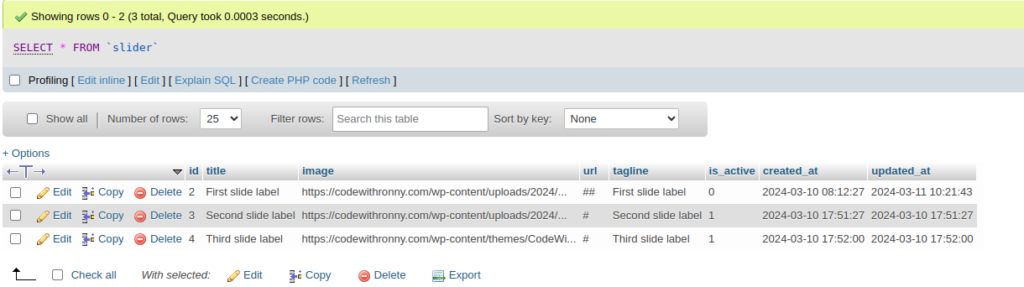
Result:

Troubleshooting Laravel HTTP Error 500 on Shared Hosting cPanel
About Author
I am a Web Developer, Love to write code and explain in brief. I Worked on several projects and completed in no time.
View all posts by Sunil Shaw


Leave a Comment